
midjourney ट्यूटोरियल
Midjourney से Japanese Movie Atmosphere: पोज़्ड शॉट्स को अलविदा
Midjourney AI Team · 23 जुलाई 2026 · 8 min read
Keywords: midjourney hindi guide, ai portrait tips
Published: 23 जुलाई 2026 Author: Midjourney AI Team
यह गाइड किसके लिए है
यह ट्यूटोरियल उन क्रिएटर्स के लिए designed है जो अक्सर AI-generated portraits में आने वाले sterile, plastic look से थक चुके हैं। अगर आप सिर्फ एक सुंदर चेहरा नहीं, बल्कि एक specific mood—nostalgia, longing, या candid motion—capture करने की कोशिश कर रहे हैं, तो यह workflow आपके लिए है। हम standard beauty shots से हटकर visual storytelling की दुनिया में कदम रख रहे हैं। आपको professional photographer होने की जरूरत नहीं है, लेकिन cinematic language को Midjourney parameters में translate करना आना चाहिए। इस गाइड के अंत तक, आप ऐसी images generate कर पाएंगे जो digital rendering के बजाय 1990s Japanese film के stills जैसी लगें।
Standard AI Portraits की समस्या
ज्यादातर default Midjourney prompts ऐसी images बनाते हैं जो overly polished लगती हैं। Lighting बहुत perfect होती है, skin बहुत smooth होती है, और subject हमेशा symmetric smile के साथ सीधे camera की ओर देख रहा होता है। इसे हम "posed feeling" कहते हैं। यह immersion को तोड़ता है क्योंकि real life शायद ही कभी symmetric होती है। Real life में wind, awkward angles, और background में distractions शामिल होते हैं।
जब आप एक standard portrait generate करते हैं, तो AI default high-key lighting setup के साथ आता है जिसका blurred background "stock photo" चिल्लाता है। इसे ठीक करने के लिए, हमें imperfection लाना होगा। हमें AI को सीधे नहीं, बल्कि ऊपर देखने के लिए कहना होगा। हमें environmental elements add करने होंगे जो एक specific place और time का suggestion दें। लक्ष्य एक narrative gap create करना है जहाँ viewer को यह आश्चर्य हो कि shutter click होने से ठीक पहले क्या हुआ था।
Japanese Movie Aesthetic को समझना
इस specific vibe को replicate करने के लिए, हम तीन core visual pillars पर rely करते हैं। ये केवल decorative नहीं हैं; ये structural elements हैं जो AI को उसके default beauty mode से बाहर निकालते हैं।
1. Low Angle Perspective
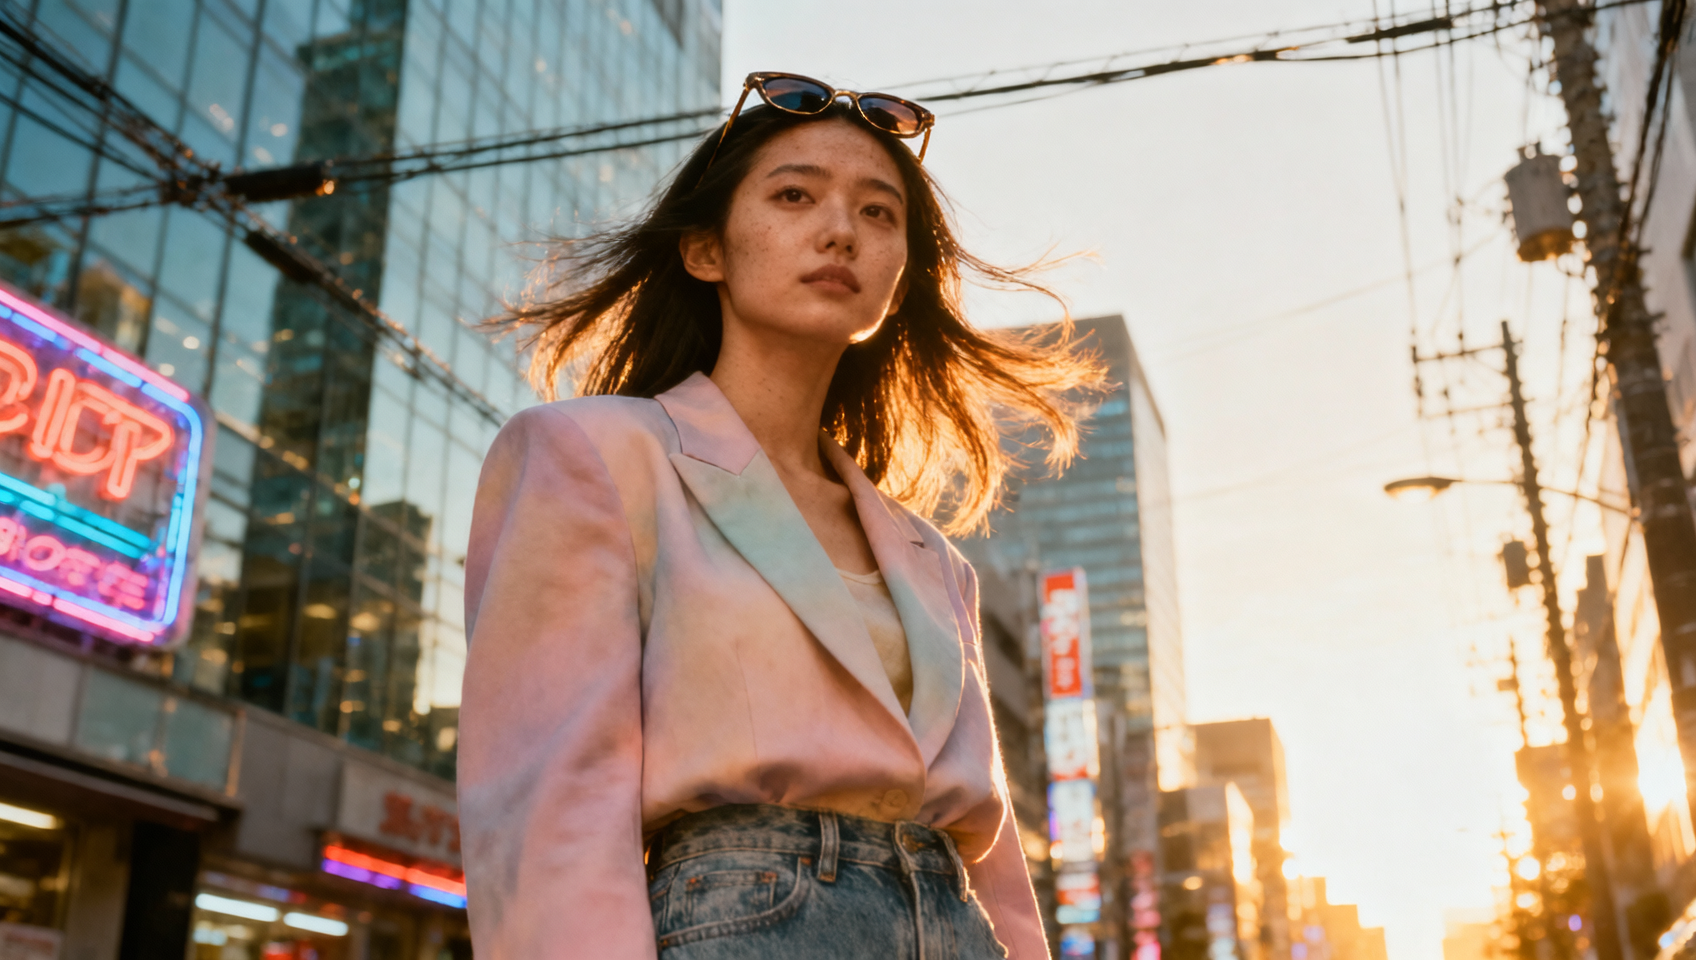
नीचे से shooting करने से image की power dynamic बदल जाती है। यह subject को larger than life बनाता है जबकि उनके ऊपर sky या urban infrastructure expose होता है। Midjourney में आप camera को physically move नहीं कर सकते, इसलिए आपको angle को describe करना होगा। ऐसे terms का use करें जैसे low angle shot, worm's eye view, या looking up at subject। यह तुरंत standard eye-level portrait composition को हटा देता है।
2. Urban Background (Power Lines)
"Japanese city pop" कहने के लिए twilight sky के खिलाफ उलझी हुई power lines जैसा कुछ नहीं। यह negative space में texture और depth add करता है। यह image को एक specific reality में ground करता है। इन details के बिना, background एक generic blur बना रहता है। overhead power lines, telephone poles, या urban infrastructure के लिए explicitly prompt करने से AI को subject के पीछे concrete geometry render करने को मिलता है।
3. Motion और Wind
Static hair fake लगता है। Windblown hair movement और time का suggestion देता है। हम चाहते हैं कि hair कभी-कभी चेहरे के एक हिस्से को obscure करे। यह imperfection humanity add करता है। windblown hair, hair covering eyes, या dynamic motion के लिए prompt करें। यह rendering engine को specific areas में sharpness के ऊपर motion blur को priority देने का signal देता है।
Quick Takeaways
Prompt Engineering और Parameters
Prompt लिखना केवल आधी लड़ाई है। आप जो parameters append करते हैं, यह determine करता है कि Midjourney आपके artistic intent को कितनी strictly follow करता है। इस aesthetic के लिए, हम improved lighting models का leverage लेने के लिए Midjourney Version 7 या higher का use करने की recommendation करते हैं।
यहाँ एक base structure है जिसे आप adapt कर सकते हैं। ध्यान दें कि हम subject description से पहले camera angle को priority देते हैं।
यहाँ एक example prompt दिया गया है:
/imagine prompt: low angle shot of a japanese girl looking up at the sky, windblown hair covering eyes, overhead power lines, twilight city background, cinematic lighting, film grain, nostalgic mood --style raw --ar 16:9 --v 7
--style raw का use क्यों करें
यहाँ --style raw parameter critical है। Default रूप से, Midjourney अपनी training data के अनुसार images को beautiful बनाने की कोशिश करता है। --style raw इस beautification bias को reduce करता है। यह harsher lighting, more realistic skin texture, और compositions को allow करता है जो otherwise default model द्वारा "ugly" के रूप में reject किए जा सकते हैं। Movie still look के लिए, आपको prettiness से ज्यादा realism चाहिए।
Aspect Ratio और Lighting
हम widescreen cinema की नकल करने के लिए --ar 16:9 का use करते हैं। एक square या portrait crop social media जैसा लगता है; एक wide crop film जैसा लगता है। अगर आपको more vintage feel चाहिए, तो --ar 4:3 try करें। Lighting के लिए, "studio lighting" जैसे terms से बचें। इसके बजाय, इसे environment में grounded रखने के लिए natural light, street lamp glow, या golden hour का use करें।
MidassAI Studio Users के लिए Exclusive Tips
जब आप MidassAI Studio Midjourney के अंदर काम कर रहे होते हैं, तो आपके पास streamlined interface का फायदा होता है जो आपके लिए इन parameters को manage करता है। हालांकि, underlying logic को समझना आपको तब results को tweak करने में मदद करता है जब first generation बिल्कुल सही नहीं होता है।
- Gaze पर Iterate करें: अगर subject बहुत happy लग रहा है, तो
longing gazeयाmelancholic expressionadd करें। Emotion lighting को drive करता है। - Wind को Control करें: अगर hair बहुत messy है, तो
strong windके बजायslight breezeadd करें। - Color Grading: Prompt में
color gradedयाfujifilm simulationadd करें ताकि color palette को उस specific nostalgic teal और orange look की ओर push किया जा सके जो City Pop visuals में common है।
अगर आप खुद को constantly इन settings को adjust करते हुए पाते हैं, तो अपने workspace में preferred parameter sets को save करने पर विचार करें। आप MidassAI Studio Midjourney में workflows try करके इन tools की full power को directly access कर सकते हैं।
Static Images से आगे: Multimodal Future
हालांकि यह गाइड static imagery पर focus करती है, composition के principles video और audio generation के लिए same रहते हैं। "Posed feeling" AI video में equally detrimental है। जब आप इन images के basis पर video clips generate करने की ओर बढ़ते हैं, तो low angle और environmental noise को maintain रखें।
आपके workflow में अगला कदम इन stills को animate करना हो सकता है। इन images को video में convert करने वाले tools उस depth cues पर rely करते हैं जो आपने prompt में establish किए थे। अगर आपके पास background में power lines हैं, तो motion के दौरान parallax effect much more convincing होगा। इसी तरह, AI music generators आपके prompt metadata में "nostalgic" और "city pop" tags को pick कर सकते हैं matching soundscapes generate करने के लिए। अपनी image generation को एक larger media pipeline के part के रूप में treat करने से सभी assets में consistency ensure होती है।
Posed Feel Immersion को क्यों तोड़ता है
अंततः, हम posed look से बचने का कारण psychological है। Viewers subconsciously recognize करते हैं जब एक image staged होती है। Lens की ओर सीधे देखने वाला subject viewer से attention demand करता है। Hair से obscured, या ugly power lines द्वारा framed, और away देखने वाला subject viewer को एक ऐसे moment को observe करने के लिए invite करता है जिसका वे part नहीं थे। यह portrait और story के बीच का अंतर है।
Midjourney दोनों में सक्षम है, लेकिन यह default रूप से portrait की ओर जाता है। Prompt engineer के रूप में यह आपका काम है कि आप इसे story की ओर push करें। Angle, environment, और motion को manipulate करके, आप narrative को वापस पा लेते हैं। पहले grid पर settle न करें। Wind direction या background wires की density को refine करने के लिए variation tools का use करें।
अंतिम विचार
Authentic atmospheric images बनाने के लिए यह जरूरी है कि आप scenes को describe करने के तरीके में बदलाव करें। Person को describe करना बंद करें और moment को describe करना शुरू करें। Low angle, wires, और wind सिर्फ details नहीं हैं; वे context हैं जो image को believable बनाते हैं। अपने अगले session में इन parameters के साथ experiment करें। एक अधिक integrated experience के लिए जहाँ आप इन generations को अपने अन्य AI tools के alongside manage कर सकते हैं, MidassAI Studio पर जाएं।
क्या आप stock photos generate करना बंद कर art बनाने के लिए तैयार हैं? इन advanced workflows को access करने के लिए आज ही MidassAI Studio में Midjourney try करें।